CloudCompare (CC)
Tool for general work with pointclouds (including cartesian, color, and normal operations). Used for data processing before meshing and texturing.
Normals computing
- Recommend to use with .e57 or .ptx data.
Edit -> Normals -> Compute- The options below are description from the official documentation.
- Local surface model
- (best fit) Plane - robust to noise but very bad with sharp edges and corners
- Triangulation - weak to noise but good with sharp edges
- Quadric - very good for curvy surfaces
- Neighbors
- Structured clouds can be associated to a grid structure. This grid structure can be used to determine the neighbors around each point. However this is generally not better nor faster. This structure is however very useful to orient the normals properly.
- Orientation
- Use sensor(s) whenever possible - recommend to use for .e57
- If the cloud is associated to a grid structure, then this structure can be used to very guess the right normal orientation quickly and in a very robust way - probably good to use with .ptx, but check
-
If sensor position not available, recommend to use the default parameters set. Example as image below. The
octreevalue depends on the model.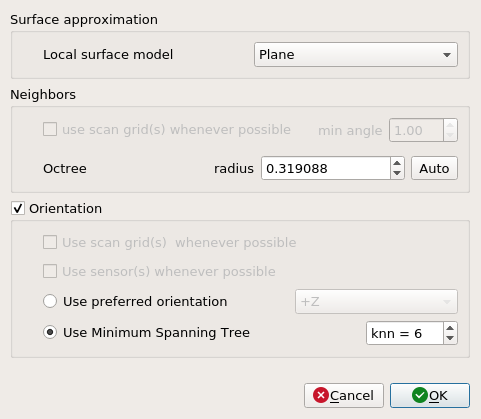
- Some parts might have inverted normals orientation. I did not find the way how to check this in the
CloudCompare. I recommend to export the data and check it in theMeshlab.CloudCompareallows to invert normals withEdit->Normals->Invert. The function inverts all normals. Cut the model in pieces withMeshlabbefore inverting to invert only the required parts.
Smoothing colors
Edit -> Colors -> Convert to Scalar field- For each scalar field
{R, G, B}- select scalar field in cloud properties
Edit -> Scalar fields -> Gaussian filter- lower kernel size: less smoothing (keeps more detail but filters less noise)
- higher kernel size: more smoothing (keeps less detail but filters more noise)
Edit -> Colors -> From Scalar fields- be sure to select the correct R, G, B channels
- the dynamic range is clipped by default: move the color arrows to reverse this
- set alpha to 255
Command line mode
CC command line mode opens a way for scripting of most of the functions available within CC GUI. Scripting is faster than GUI and provides repeatability: prefer scripting over GUI. Example script is available here. Example command merging two .ptx files, exporting them to .ply, sampling the data to resolution of 2 cm and exporting the sampled data to .ply:
CloudCompare -AUTO_SAVE OFF -O Setup249.ptx -O Setup250.ptx -MERGE_CLOUDS -C_EXPORT_FMT PLY -SAVE_CLOUDS FILE "merge_raw.ply" -SS SPATIAL 0.02 -SAVE_CLOUDS FILE "merge_raw_sampled_2cm.ply"
Manual compilation
Get latest release version from CC Github. Latest release on April 6, 2022: v2.12.0.
cd $GIT_PATH
git clone git@github.com:CloudCompare/CloudCompare.git
cd CloudCompare
git checkout v2.12.0

mkdir -p build
cd build

cmake \
  -DEIGEN_ROOT_DIR="$EIGEN_ROOT_DIR" \
  -DPLUGIN_GL_QEDL=ON \
  -DPLUGIN_GL_QSSAO=ON \
  -DPLUGIN_IO_QADDITIONAL=ON \
  -DPLUGIN_IO_QCORE=ON \
  -DPLUGIN_IO_QE57=ON \
  -DPLUGIN_IO_QPHOTOSCAN=ON \
  -DPLUGIN_IO_QPDAL=OFF \
  -DPLUGIN_IO_QRDB=ON \
  -DPLUGIN_IO_QRDB_FETCH_DEPENDENCY=ON \
  -DPLUGIN_IO_QRDB_INSTALL_DEPENDENCY=ON \
  -DPLUGIN_STANDARD_QANIMATION=ON \
  -DQANIMATION_WITH_FFMPEG_SUPPORT=OFF \
  -DPLUGIN_STANDARD_QBROOM=ON \
  -DPLUGIN_STANDARD_QCANUPO=OFF \
  -DPLUGIN_STANDARD_QCOMPASS=ON \
  -DPLUGIN_STANDARD_QCSF=ON \
  -DPLUGIN_STANDARD_QFACETS=ON \
  -DPLUGIN_STANDARD_QHOUGH_NORMALS=OFF \
  -DPLUGIN_STANDARD_QHPR=ON \
  -DPLUGIN_STANDARD_QM3C2=ON \
  -DPLUGIN_STANDARD_QPCV=ON \
  -DPLUGIN_STANDARD_QPOISSON_RECON=ON \
  -DPLUGIN_STANDARD_QSRA=ON \
  -DPLUGIN_STANDARD_QRANSAC_SD=OFF \
  -DPLUGIN_STANDARD_QPCL=ON\
  ..

cmake --build . --parallel
sudo cmake --install .
Extracting images
- Import
.e57file in separate setups (structured) variant. - Select appropriate scan and expand the structure tree to see the content of the scan. You should see a
TLS\GBLand a 6 image files. - Select the image you would like to export and save it with the
Savebutton.
Extracting sensor positions
- Import
.e57file in separate setups (structured) variant. - Select appropriate scan and expand the structure tree to see the content of the scan. You should see a
TLS\GBLand a 6 image files. - Every image contains a
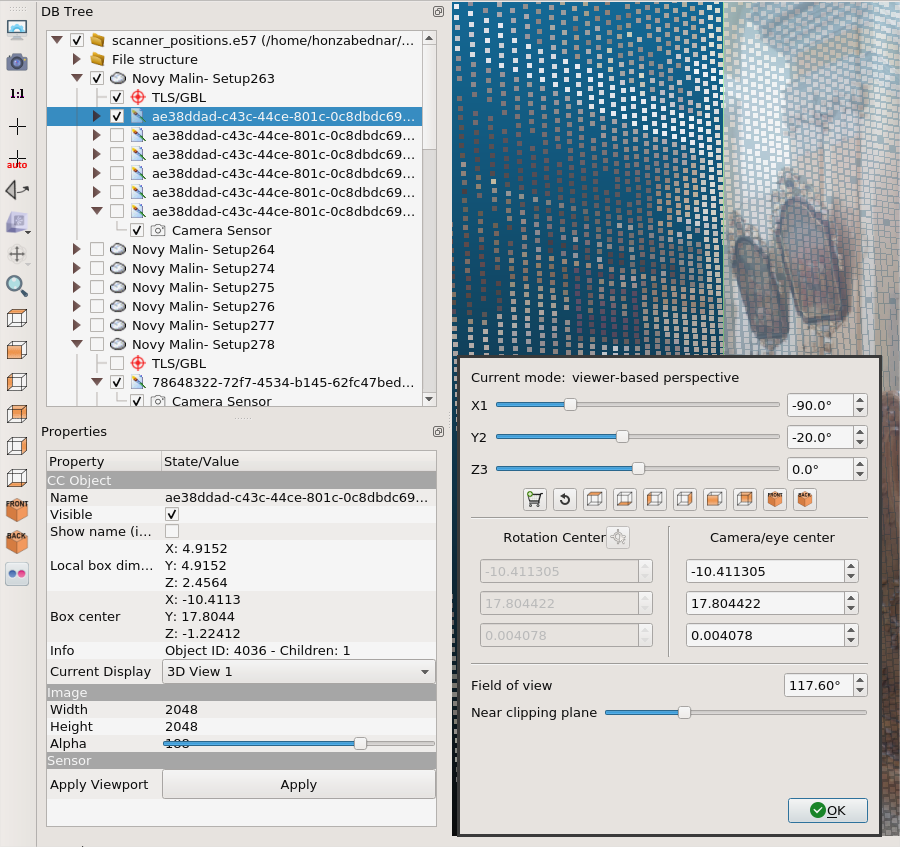
Camera Sensorwith exact position of the picture w.r.t. to the model. - Select the
Camera Sensorand scroll in thePropertieswindow down toPosition/Orientationsection. Change it toExporttab and save withASCIIoption to the file. -
CloudCompare and MeshLab uses different rotation matrix system, so the
Camera Sensoroutput has to be transformed before use as shown in the image below or the appropriate transformation :)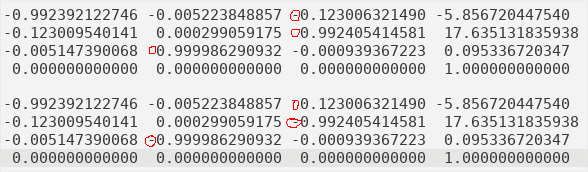
-
Note: To check the image alignment in the CloudCompare, change the FOV of the camera in
Camera settingsof the image view to117.60°. This will allow you to visually compare the alignment sensor position and the pointcloud behind.